Followers

Powered by Blogger.
Showing posts with label Windows OS. Show all posts
Friday, May 20, 2011

Tutorial Virtual Machine with Virtual box in your Windows

longtime kartolocyber wasnot update the article, some of us so busy in our study. okey, i'll write about virtual machine in Windows. Sometimes, there is a particular program that we want to run but is plagued with compatibility Operating System (OS). For example there are applications that we know first run on WinXP but now after a try again in Win7 not be opened (crash). Or even it could also have a special application we need to work, but teryata application can only run on Windows while Linux-based computer.

Of course, we can use the system to plant two Dual Booting OS in one computer. But sometimes this method is less practical because more needs to be prepared such as set partitioning, manage files, etc.. In addition, if one day we already do not need a second OS, then the uninstall process was not easy. All too often ended up reformatting, and that means set the partitions and file again.
Actually, there is one practical solution to this, that is by using VirtualBox. With VirtualBox, you can as if making a new computer ( virtual machine ) and install it with the OS you want (Guest OS). More great again, you can run both at the same time, moving from guest to host and vice versa with ease. If it does not need anymore, you just delete it (remove) the virtual machine without a complex process.

Well, in this article I will explain about how to create a virtual machine using VirtualBox. Because many things to be explained, for convenience, so I split them up into several sections, namely: Download & installl Virtual Box, Virtual Machine http://www.blogger.com/img/blank.gifSetup & Guest OS, and the last is the setting. In this example, I will install WinXP in a virtual machine that will be created. As for his own VirtualBox I run across operating systems Win7. So, the Guest OS and Host OS = WinXP = Win7. Here are the steps:
DOWNLOAD & INSTALL VirtualBox

First download the installer once its in here . Select according to the type of OS you use.


1. After that run its installer file. Click Next> when VirtualBox Setup Wizard appears.

2. Then you can choose the installation location. Click Next> to continue.

3.Choose anywhere you want a shortcut is created, then click Next>

4. Usually will appear warning that the connection to the network is disconnected while on during the installation process. Just click Next>.

5. Click Install to begin the installation process.

6. If UAC appears, click Yes.

7. Up here you've managed to install VirtualBox. Click Finish to run the VirtualBox program

VIRTUAL MACHINE SETUP

Next you need to do is make her a virtual machine. Click New on VirtualBox Manager to get started. You will be greeted by the New Virtual Machine Wizard. Click Next to continue. Here you will choose what type of OS you want to install as guest OS. In this example we will install WinXP. Click Next when done select the type of OS. You can determine how much memory (RAM) for the virtual machine later. Move the slider to the desired number, then click Next.For the first time, make sure you men-centang/contreng Boot Hard Disk and also select Create new hard disk, If so, click Next. Next you will go to the Create New Virtual Disk Wizard. Click Next to continue. You can choose whether the size of virtual hard disk later this magnitude can change or always remain. For savings should you choose a dynamically expanding storage. Click Next if you have selected. Here you can choose the location where the virtual hard disk will be created, it also determines the maximum size hard disk (hard disk maximum size). VirtualBox by default suggested size is 10 G. But you also can set smaller as long as you believe that size is sufficient for your needs later. Click Next. This is a Summary of the Create New Virtual Disk Wizard. Click Finish. It appears that you already have a virtual machine called WinXP, although it is still empty. Now the next task is to fill this virtual machine with the Guest OS. Double-click on the entry to start WinXP.
You will be greeted by First Run Wizard. Just click Next.Here you will select the media you will use as a source installation. In this example I use WinXP CD (bootable of course), which I enter into Drive E (DVD ROM). If so, click Next. This is a Summary of the First Run Wizard. It's good here you have prepared her to drive installer that you selected earlier. Click Finish to begin the installation process. Display WinXP installation will start out. Press Enter to continue. Select Format the partition using the NTFS file system, then press Enter. Please wait until the WinXP installation process is complete.
Congratulations, you now have a WinXP Guest OS on your virtual machine! Before you start "playing around" with this new virtual machine it's good to do some changes to the settings used to make you more comfortable in using it later. Some settings require the virtual machine in a non-active, some can only be done in the Guest OS Safe Mode. Thus, to present first shutdown the Guest OS you.

SETTING UP PROCCESS

This time will discuss about some important settings of your order the more comfortable in using your virtual machine. Make sure your virtual machine is turned off (powered off), then double-click to turn on and be prepared to press F8 as we will go into Safe Mode.

Choose Safe Mode, then Enter twice.
After entering Safe Mode, click Yes to close the window notification.
In the VirtualBox menu, select Devices -> Install Guest Additions.
It would appear the Windows Explorer . Double-click VBoxWindowsAdditions.
You will be greeted by the VirtualBox Guest Additions Setup Wizard. Click Next> to continue.
Select the installation location and click Next>.
If you plan to run an application in the Guest OS that require Direct3D (games for example), then make sure the Direct3D Support selected. If you already click Install.
Guest Additions installation process was completed. Click OK.
Click Finish to restart and get into WinXP as normal.
Next we'll create a Shared Folders. Usefulness is as a place to exchange (transfer) files between Guest and Host. The trick is to select Devices -> Shared Folders.
Click the Add button on the right side of the window.
In the Folder Path, select Other.
Specify the folder where you want shared.
Then select Auto-mount that folder directly at-shared automatically at startup.
Rekapnya be seen here. You also can create more than one Shared Folders if you wish. Click OK to finish.
Shared Folders will only begin to be used if you have to restart. But for now the Guest OS shutdown before you because we will make changes in the last settings via VirtualBox Manager.
Click Settings on the menu VirtualBox Manager.
Select the System tab on the left. Well here you can make settings memory (RAM) and also the Boot Order. In order for fast booting, select Hard Disk as the Boot Order first priority.
Select the Display tab and you can change the amount of Video Memory (VGA Card) and also activate the Enable 3D Acceleration feature. Click OK if it is.
Next run the virtual machine again. After entering Windows, try running Explorer. It appears that the Shared Folders now can be accessed.
Applications that can not be opened in Win7 are now able to run.

an explanation of the technical steps to create a virtual machine and its installation with the Guest OS using VirtualBox. In this way, we seemed to have a "new computer" is ready to run. In the world of IT, many benefits to be gained by using this VirtualBox. A Java programmer who want to create a multi-platform applications, can use VirtualBox to test programs in various OS (Windows, Mac, Linux, FreeBSD, etc.).

Or someone who is studying to be a hacker, usually also will create a virtual machine to test the efficacy of scripts or artificial virus, without having to worry about major OS that is being used also infected. You can also experiment with VirtualBox it suits your needs.
Wednesday, March 9, 2011

Windows Installer 5 on Microsoft Windows 7


Windows Installer 5.0 is available for both Microsoft Windows 7 and Windows Server 2008 R2. With Windows Installer 5.0, setup developers can use Windows Installer 5.0 to author a single installation package capable of either per-machine installation or per-user installation of the application.Beginning with Windows Installer 5.0, a package can be authored to secure new accounts, Windows Services, files, folders, and registry keys. The package can specify a security descriptor that denies permissions, specifies inheritance of permissions from a parent resource, or specifies the permissions of a new account. For information, see Securing Resources. The Windows Installer 5.0 service can enumerate all components installed on the computer and obtain the key path for the component.

Windows Installer 5.0 has been released with, and require Windows Server 2008 R2 or Windows 7. Versions earlier than Windows Installer 5.0 were released with Windows Server 2008, Windows Vista, Windows Server 2003, Windows XP, and Windows 2000.

Windows Installer 4.5 was available as a redistributable for Windows Vista RTM and Service Pack 1, Windows XP Service Pack 3 and earlier, Windows Server 2008 RTM/SP1, and Windows Server 2003 SP1 and SP2.

unlike Windows Installer 5, Windows Installer 4.5 does not support some features that enable a single installation package to be installed in either the per-machine or per-user installation context.Moreover, Windows Installer 4.5 does not support some services configuration options that can enable a package to customize the services on a computer.It also does not support some features that enable the Windows Installer to secure new accounts, Windows Services, files, folders, and registry keys.

Get Windows 7 and enjoy the new capabilities in Windows Installer 5.Note that windows 7 free download is available for students of schools enrolled in MSDN AA (Microsoft Developer Network Academic Alliance) program and free Windows 7 upgrade is available for buyers of windows vista.

Sunday, October 31, 2010

Windows 7and Server 2008 R2 Patch Detail

Microsoft has released a number of non-security updates, the majority of which are for the latest versions of its client and server operating systems. All the patches are available on Windows Update and the Microsoft Download Center and most will require a restart. With the exception of the last patch, they're all for Windows 7 or Windows Server 2008 R2.

Most of these updates will be rolled into Service Pack 1 for Windows 7 and Windows Server 2008 R2. Testers got the first Windows 7 SP1 beta build two months ago, but just today Microsoft sent out build 7601.17077 to selected PC and Technology Adoption Program partners, according to ZDNet.

The first patch (KB2028560) is vaguely described as one that delivers "new functionality and performance improvements for the graphics platform."

The second patch (KB2249857) describes an issue that occurs on 2TB+ hard disk drives. If the OS is configured to save dump files to a volume of such an HDD, some of the dump file is offset at a disk offset greater than the 2TB address, and Windows is either put into hibernation or crashes, volumes on the HDD may be corrupted, and data is lost. If the corrupted volumes include the system partition, the computer will no longer boot.

The third patch (KB982110) fixes a problem when running 32-bit applications on a 64-bit edition of Windows 7 or Windows Server 2008 R2. If the application uses the QueryPathOfRegTypeLib function to retrieve the path of a registered type library, it may return the path of the 64-bit version of the type library instead of the 32-bit one.

The fourth patch (KB2272691) is for a game, application, or firmware that is either installed incorrectly, causes system instability, or has primary functions that do not work correctly. The update will either prevent incompatible software from running (hard block with third-party manufacturer consent), notify the user that incompatible software is starting to run (soft block), or improve the software's functionality (update). It lists just a single application (Sensible Vision FastAccess) as being affected.

The fifth patch (KB2203330) solves a problem when installing a third-party application for the multiple transport Media Transfer Protocol (MTP) device or for the Windows Portable Device (WPD). Connecting an MTP or WPD device may result in an APC_INDEX_MISMATCH stop error message because of a race condition in the Compositebus.sys driver.

The last patch (KB979453) is for Windows Home Server and addresses five separate issues that were found since the release of WHS Power Pack 3.

Microsoft Windows Azure Future Concept

Microsoft unveiled its roadmap for the Windows Azure cloud computing platform. Moving beyond mere Infrastructure-as-a-Service (IaaS), the company is positioning Windows Azure as a Platform-as-a-Service offering: a comprehensive set of development tools, services, and management systems to allow developers to concentrate on creating available, scalable applications.

Over the next 12-18 months, a raft of new functionality will be rolled out to Windows Azure customers. These features will both make it easier to move existing applications into the cloud, and enhance the services available to cloud-hosted applications.

The company believes that putting applications into the cloud will often be a multistage process. Initially, the applications will run unmodified, which will remove patching and maintenance burdens, but not take advantage of any cloud-specific functionality. Over time, the applications will be updated and modified to start to take advantage of some of the additional capabilities that the Windows Azure platform has to offer.

Microsoft is building Windows Azure into an extremely complete cloud platform. Windows Azure currently takes quite a high-level approach to cloud services: applications have limited access to the underlying operating system, and software that requires Administrator installation isn't usable. Later in the year, Microsoft will enable Administrator-level access and Remote Desktop to Windows Azure instances.

For even more compatibility with existing applications, a new Virtual Machine role is being introduced. This will allow Windows Azure users to upload VHD virtual disks and run these virtual machines in the cloud. In a similar vein, Server Application Virtualization will allow server applications to be deployed to the cloud, without the need either to rewrite them or package them within a VHD. These features will be available in beta by the end of the year. Next year, virtual machine construction will be extended to allow the creation of virtual machines within the cloud. Initially, virtual machine roles will support Windows Server 2008 R2; in 2011, Windows Server 2003 and Windows Server 2008 with Service Pack 2 will also be supported.

Microsoft also has a lot to offer for applications that are cloud-aware. Over the past year, SQL Azure, the cloud-based SQL Server version, has moved closer to feature parity with its conventional version: this will continue with the introduction of SQL Azure Reporting, bringing SQL Server's reporting features to the cloud. New data syncing capabilities will also be introduced, allowing SQL Azure to replicate data with on-premises and mobile applications. Both of these will be available in previews by the end of the year, with final releases in 2011.

A range of new building-block technologies are also being introduced, including a caching component (similar to systems such as memcached) and a message bus (for reliable delivery of messages to and from other applications or mobile devices). A smaller, cheaper tier of Windows Azure instances is also being introduced, comparable to Amazon's recently-released Micro instances of EC2.

The breadth of services that Microsoft is building for the Windows Azure platform is substantial. Compared to Amazon's EC2 or Google's AppEngine, Windows Azure is becoming a far more complete platform: while EC2 and AppEngine both offer a few bits and pieces that are comparable (EC2 is particularly strong at hosting existing applications in custom virtual machines, for example), they aren't offering the same cohesive set of services.

Nonetheless, there are still areas that could be improved. The billing system is currently inflexible, and offers no ability for third parties to integrate with the existing Windows Azure billing. This means that a company wishing to offer its own building blocks for use by Windows Azure applications has to also implement its own monitoring and billing system. Windows Azure also has no built-in facility for automating job management and scaling.

Both of these gaps were pertinent to one of yesterday's demonstrations. Animation studio Pixar has developed a prototype version of its RenderMan rendering engine that works on Windows Azure. Traditionally, RenderMan was only accessible to the very largest animation studios, as it requires considerable investment in hardware to build render farms. By moving RenderMan to the cloud, smaller studios can use RenderMan for rendering jobs without having to maintain all those systems. It allows RenderMan to be sold as a service to anyone needing rendering capabilities.

Neither job management—choosing when to spin up extra instances, when to power them down, how to spread the different frames that need rendering between instances—nor billing are handled by Windows Azure itself. In both cases, Pixar needed to develop its own facilities. Microsoft recognizes that these are likely to be useful to a broad range of applications, and as such good candidates for a Microsoft-provided building block. But at the moment, they're not a part of the platform.

Microsoft CEO Steve Ballmer has said that Microsoft is "all in" with the cloud. The company is certainly working hard to make Windows Azure a better platform, and the commitment to the cloud extends beyond the Windows Azure team itself. Ars was told that all new development of online applications within Microsoft was using Windows Azure, and with few exceptions, existing online applications had migration plans that would be implemented in the next two years. The two notable exceptions are Hotmail and Bing, both of which already have their own, custom-built, dedicated server farms.

This internal commitment is no surprise given the history of the platform. Windows Azure was originally devised and developed to be an internal platform for application hosting. However, before there was any significant amount of internal usage, the company decided to offer it as a service to third parties. Now that the platform has matured, those internal applications are starting to migrate over. As such, this makes Windows Azure, in a sense, the opposite to both EC2 and AppEngine. Those products were a way for Amazon and Google to monetize their preexisting infrastructure investment—investment that had to be made simply to run the companies' day-to-day business.

With the newly announced features, there's no doubt that Windows Azure is shaping up to be a cloud computing platform that is both powerful and flexible. Microsoft is taking the market seriously, and its "all in" position seems to represent a genuine commitment to the cloud. What remains to be seen is whether this dedication will be matched by traditionally conservative businesses and developers, especially among small and medium enterprises. A move to the cloud represents a big change in thinking, and the new Windows Azure features will do nothing to assuage widespread fears such as a perceived loss of control. It is this change in mindset, not any technological issue, that represents the biggest barrier to widespread adoption of Windows Azure, and how Microsoft aims to tackle the problem is not yet clear.

Friday, October 8, 2010

System Restore dengan Safe Mode Command Prompt

System restore sebenarnya tidak hanya dilakukan melalui jendela windows. Cara lain yang sebenarnya juga sangat mudah dan cepat adalah system restore melalui safe mode Command Prompt. Itulah yang akan saya bahas kali ini. Artikel ini berlaku untuk versi Windows XP dan saya belum mencoba pada versi windows terbaru seperti Windows Vista dan Windows 7. Jika Anda punya pengalaman, silakan sharing disini. Isi dalam artikel ini mungkin tidak relevan bagi sistem operasi Anda jika menggunakan versi lain dari windows.

dini saya akan menjelaskan cara untuk memulai System Restore dalam safe mode dengan menggunakan Command prompt (SAFEBOOT_OPTION = Minimal (AlternateShell)). Pilihan ini digunakan ketika Anda tidak bisa menjalankan sistem restore melalui jendela Windows XP.

System Restore merupakan sebuah tool yang secara otomatis memantau dan mencatat setiap perubahan yang dibuat pada file sistem Windows dan registri. Jika perubahan menyebabkan sistem anda menjadi tidak stabil, System Restore dapat membatalkan (atau “roll back”) sistem kesebuah titik waktu ketika komputer Anda masih dapat berfungsi dengan benar.

Bagaimana memulai System Restore menggunakan Command prompt, syarat pertama adalah Anda harus masuk ke Windows dengan account administrator, bukan sebagai user limited. Untuk memverifikasi bahwa Anda logon ke Windows dengan account pengguna sebagai administrator komputer, kunjungi Website Microsoft berikut ini:
http://support.microsoft.com/gp/admin (http://support.microsoft.com/gp/admin)
Jika sebuah program baru telah membuat komputer Anda crash, dan menguninstall program baru ini tidak dapat membantu, Anda dapat mencoba Windows XP System Restore melalui command prompt.

Syarat kedua adalah sistem restore hanya dapat dilakukan jika sebelumnya Anda mengaktifkan System Restore pada windows, jika tidak maka Anda tidak dapat mengembalikan komputer Anda ke keadaan sebelumnya.

Untuk memulai System Restore menggunakan Command prompt, ikuti langkah berikut:

1. Restart komputer Anda, kemudian tekan terus F8 pada saat startup awal untuk memulai komputer Anda dalam safe mode dengan Command prompt.
2. Gunakan tombol panah untuk memilih Safe Mode dengan opsi Command prompt.
3. Jika Anda diminta untuk memilih sistem operasi, gunakan tombol panah untuk memilih sistem operasi yang sesuai untuk komputer Anda, kemudian tekan ENTER.
4. Logon sebagai administrator atau dengan account yang memiliki level administrator.
5. Jika Anda sudah masuk pada jendela command prompt silakan ketik: %systemroot%/system32/restore/rstrui.exe, dan kemudian tekan ENTER.
6. Ikuti petunjuk yang muncul di layar untuk mengembalikan komputer Anda ke keadaan semula sebagaimana layaknya sebelum mengalami kerusakan.
Saturday, October 2, 2010

Free Download DirectX 11

free download directx 11 imagesDirectX 11 come as the next generation of Windows DirectX graphic technology will be implement on Windows 7 with support wide varieties of Windows games and graphic display devices. After making DirectX 10 available for windows Vista, Microsoft has released DirectX 11 with Direct3D 11 available for download as technical preview for public testing.

“This version of the Windows 7/Direct3D 11 Technical Preview ships as part of the DirectX SDK and contains the following new features, tools, and documentation: Technical Preview of Direct2D; Technical Preview of DirectWrite; Technical Preview of DXGI 1.1,” the Redmond company informed.

As Windows 7/Direct3D 11 Technical Preview is part of DirectX SDK and contains Technical Preview of Direct2D, DirectWrite, DXGI 1.1. Good news is, it is not only available as Technical Preview but also as DirectX End-User Runtimes.

This DirectX11 release contains the following new Direct features and tools:

* Technical Preview of Direct2D

Direct2D is a hardware-accelerated, immediate-mode, 2-D graphics API that provides high performance and high quality rendering for 2-D geometry, bitmaps, and text. The Direct2D API is designed to interoperate well with Direct3D and GDI. This technical preview allows developers to evaluate the API and write simple applications, with some of the more advanced functionality possible on properly configured machines.

* Technical Preview of DirectWrite

DirectWrite provides support for high-quality text rendering, resolution-independent outline fonts, and full Unicode text and layout support, and much, much more.

* Technical Preview of DXGI 1.1

DXGI 1.1 builds on DXGI 1.0 and will be available on both Windows Vista and Windows 7. DXGI 1.1 adds several new features.

for download, check link bellow :

Download DirectX 11 Software Development Kit

Download DirectX 11 End-User Runtimes


Download DirectX 11 Web Installer


However, Direct3D 11 (DirectX 11) that supported on Windows 7 and Windows Vista only. Except Windows XP users cannot install DirectX 11.
Friday, October 1, 2010

Windows Home Server back up relink to build PC

One of your PCs has had a hard disk failure, or you are rebuilding the PC for some other reason – like an OS upgrade. Once done, you install the Windows Home Server Connector and even though you have given the PC exactly the same name (or maybe you didn’t) you see the computer listed as a new PC in the WHS Console. You would really like your newly rebuilt system to be associated with the backups of the same system you have from before, but you cannot see any way to achieve this. This becomes particularly relevant for those moving from XP to Windows 7 as you have no way to preserve the settings from your old PC. Suddenly, you end up with an extra PC in your WHS list and you are not sure why, or what to do with the old one. Today, we’ll help you reunite your rebuilt PC with its former backups on Windows Home Server.


But first, let us delve into why this looks like a new PC to Windows Home Server. When the Connector is first installed on a PC, it creates a number of keys in the registry. These cover your backup preferences, which server the is associated with, the PC’s name and most importantly a unique GUID (Globally Unique Identifier). This is one of those long strings of alphanumerics enclosed in curly brackets that you see so often in Windows. To WHS, the GUID is all important, more so than the PC’s name. Names may change, but if the GUID remains the same, it is the same entity. Here lies the problem. A new build with a fresh OS install has a registry void of WHS settings and the all important GUID. Install the Connector and a new, unique GUID is created and so you have a new system connected to Windows Home Server.

Those of you half a step ahead of me will have worked out that a bit of forward planning would help the user here. Export the GUID Registry key before rebuilding and then bring it into the new build and WHS will still see it as the original PC and keep it linked to the old backups. To do this, follow these steps CAREFULLY (Regedit Alert).

1. On the PC about to be rebuilt, run Regedit. On Windows 7 and Vista, just type in regedit into the Start Menu’s search bar, and it should pop up

2. Navigate to Computer\HKEY_LOCAL_MACHINE\SOFTWARE\Microsoft\Windows Home Server

3. Right-click on the words ‘Windows Home Server’ in the tree in the left-hand pane of Regedit and select Export

regedit whs2 thumb How to: Link a Rebuilt PC to its Old Windows Home Server Backups

4. In the dialog box that pops up, navigate to somewhere where you will be able to find the file and save as WHS.reg

5. Exit Regedit. Save the WHS.reg file somewhere safe – USB key, external drive on on the server – so you can get at it after you have rebuilt the PC.

6. You can now rebuild your server with whichever version of Windows you like.

7. Once installed and set up, but before installing the WHS Connector, copy the WHS.reg file to somewhere where the PC can access it and double-click it. This will import the settings into the PC’s registry.

8. Now install the Windows Home Server Connector and your server will identify it as the original PC making a new appearance.

This is fine for those who have the benefit of acting in advance, but what do you do if your hard drive or your memory (the one in your head) failed and you haven’t got access to that original registry?

Try the following procedure as it may well help. I would add at this point is has not been exhaustively tested and so feedback would be welcome.

1. We need to run Regedit on the server itself. The warnings above now should be heeded with even more care. Mess this up and you won’t have a backup to help you. You can either run Regedit by creating a Remote Desktop Connection to the server (Start> All Programs > Accessories > Remote Desktop Connection) and running from the Start menu (Select Start > Run and type in regedit to open).

Or you can use the more convenient method of using the Advanced Admin Console add-in (you are all using this excellent add-in, aren’t you), where you will find it in the drop-down menu on the far right of the window.
Wednesday, September 29, 2010

Downgrade XP SP 3 in Dell N4010 64 bit

downgrade xp sp3 dell n4010Dell N4010 come to the market with OS microsoft Windows 7 Home Basic, but some of people feel anoying with it, windows 7 so strange than Windows XP, more familiar and simple.
i will show any one who want to downgrade their Inspiron 14R / N4010, below is the set of drivers that I collected and tested working well, and follow step by step this guide.

first think needed for this guide work is Windows XP SP 3 64 bit installation,then you must download compatible drivers need for windows XP.

Inspiron_14R_N4010_XP_Drivers_Full_Set.part1.rar
Inspiron_14R_N4010_XP_Drivers_Full_Set.part2.rar
Inspiron_14R_N4010_XP_Drivers_Full_Set.part3.rar
Inspiron_14R_N4010_XP_Drivers_Full_Set.part4.rar
Inspiron_14R_N4010_XP_Drivers_Full_Set.part5.rar
Inspiron_14R_N4010_XP_Drivers_Full_Set.part6.rar

after downloaded, extract it all in one.

Driver Group below can be installed manually after OS install:
Atheros AR813-AR815x-v1.0.0.41_WHQL LAN Adapter
SX2210-Monitor_Webcam SW RC1.1 WebCam Driver & Applications
R255591 Synaptics TouchPad
Realtek RTS5138 Card Reader 6.1.7600
DW1501 5.60.48.35 WiFi Adapter
Realtek ALC269Q-GR WDM_HD Audio R249 5.10.0.6132
ATI Display Apps & Utilities
ATI Catalyst 10.6 Drivers Modified for Mobility HD 5470
ATI HDMI DP Audio Driver 10.6_XP32-64
BT365 Bluetooth Driver & Application

and Splitstearm this data into Windows XP Installation CD:
Intel HM57 AHCI
Intel HM57 Chipset
Intel HM57 Management Engine Interface
Intel HM57 Turbo Boost Technology

Download driver sata from ftp://ftp.ins.dell.com/sata/R254174.exe , run, and extract it to C:\dell\drivers\R254174\, keep it.

download Nlite software for make a bootable CD Windows XP SP 3 64 bit.

Install Nlite, do step by step, and put Folder "C:\dell\drivers\R254174\f6flpy-x86" to cd win xp. file "iaAHCI.inf"

do Nlite till proccess finish, and Dell N4010 Downgrade XP SP 3 64 bit ready t burn to Blank CD - ROM.

after OS had installed, don't forget to install drivers needed.
for install VGA driver, First extract the ATI Catalyst 10.6 Drivers then enter Device Manager and use the "Have Disk" method to update the display driver. Have disk method is a way to install a driver that does not have any setup program to install itself automatically. In principle what you are doing is showing Windows where drivers are located. Driver installation scripts are written in *.inf files so a driver must have these files, and this file is located inside:

Drivers\Display\XP_INF\

of the extracted directory.

To access the driver update follow the steps below:
1)Click Start, right-click My Computer, and then click Properties.

2)The System Properties window will open. Click the Hardware tab, and then click Device Manager.

3)The Device Manager window will open. Double-click Display adapters.

4)Right-click on whatever display adapter it shown and click "Update Driver"

5)Select the following option when the Hardware Update Wizard asks to connect to Windows Update: No, not this time. Click Next.

6)Select the following option: Install from a list or specific location (Advanced), and then click Next.

7)Select the Don’t search, I will choose the driver to install option, and then Next

7.1) UNCheck "Show compatible hardware"

8)Click on the Have Disk... button, and then click the Browse button.

9)Browse to the directory where you extracted the driver above i.e. the Drivers\Display\XP_INF subdirectory.

10)Locate and highlight the the CX100944.inf file then Click the Open button

11)Click the OK button. A window listing all of the available display types should open. Select the "ATI Mobility Radeon HD 5470", and then click the Next button.

12)The operating system will install the driver. Click the Finish button when done.

enjoy your new XP SP 3 64 bit on your Dell N4010.
Tuesday, September 28, 2010

Microsoft Windows 8 Releases

windows 8 releases image
Microsft Windows 8(next generation of Microsoft Windows 7) is starting to take a OS market. Windows 7 is only 10 months old, but it's never too early to glance on down the road at Windows 8. Microsoft’s next version of Windows client is far enough along that the Windows team seems to have begun sharing details about its goals with Microsoft’s PC partners. A leaked slide deck — excerpts of which first appeared on the Web site of blogger Francisco Martin Garcia — don’t reveal a whole lot in terms of specific features. But they do look like the real deal, as Microsoft Kitchen blogger Stephen Chapman — who pulled out even more of the slides in his post — noted.

The leaked slides (dating from April 2010) reference “Windows 8,” not “Windows v.Next” (the Windows client team’s preferred codename these days). They indicate that the next version of Windows, which is expected by many to ship in 2012, will possibly offer some of these features:

- Fast startup (Huzzah!): A new feature combining Logoff and Hibernate to result will give the look and feel of boot/shutdown be faster

- Slates mentioned specifically as a target form factor: It will be interesting to see how Microsoft distinguishes between slates running Windows Embedded Compact and slates running Windows 8

- Push-button reset: A button “that will essentially reinstall Windows while maintaining all of your personal files, applications, settings, etc. without the need for the user to back all of that stuff up,” as Stephen Chapman of Microsoft Kitchen describes it

- Support for facial recognition as one of the ways identity management/log in will be handled

- IE 9 (no surprise there): With another confirmation of August as being the target for the first beta (though I could see this possibly slipping a bit)

- More thorough help and support, enabling users to do more fixing of issues on their own

- A Windows App Store (mentioned in the section on push-button reset)

Microsoft isn’t commenting (so far) on the slides and isn’t even confirming that they are “Genuine” Windows 8 PowerPoints — or how much they reflect current reality. However, I’d note the date on these slides is April 2010 and they sure have the vague look and feel of early Windows documentation.
Friday, September 24, 2010

About 32 Bit and 64 bit OS

32 bit and 64 bit processor difference image32 bit and 64 bit operating system? what are the difference between both of them? A 32 bit processor is faster than a 64 bit processor, 64 bit processors are very commonly used that you can find it easily in any home pc but the main difference is the hardware you are having on your machine. For 32 bits there isn't any need of any wide main bus to carry 32 bits at a time but for 64 bits its must that you should have a wider bus to carry 64bits.

The main difference between a 32 bit and 64 is that 32 bit system has 4gb(gigabytes) of space for addressing means that the 32 bit system has a limit of 4GB RAM to process data where as the 64 bit operating system has 2^64 bits of space to address and supports 16 hexabytes of RAM to process data.

In simple words an operating system of 32 bit has a 4GB limit to process any data depending upon the sizes of files and RAM. A person who does not care about the category will find 64 bit more beneficial than 32 bit because he can use 64 bit OS with 32 bit OS and software. If we compare 64 bit with 32 bit OS, 64 bit processor is faster and performs more upgraded silicon processes and have more no of transistors which proves it to be more advantageous than 32 bit.

Now most of the software companies are developing their software in accordance to the 64 bit environment, it's really hard for the consumers to run a 64 bit application in 32 bit environment, in this case they have to upgrade their hardware's such as RAM which is also a big issue because most of the computer users have less than 1Gb in their systems.

So instead of changing your hardware often I would recommend 32 bit OS over 64 bit which is more user friendly and enables its user to run applications of 64 bit in 32 bit environment.
Wednesday, September 22, 2010

Perbedaan Stand by, Hibernate, dan Shutdown

perbedaan stand by, hibernate, shut down
windows memliki tiga fitur unique stand by, hibernate, dan turn off pada yang terdapat pada menu shut down, tapi apakah anda tahu apa perbedaan diantara ketiganya? berikut prinsip dasarnya yang akan saya jelaskan.

1. Shutdown
Kalau yang ini sudah jelas, yaitu mematikan komputer secara keseluruhan. Saat kita memilih shutdown, semua komponen komputer (RAM, hardisk, prosesor, dll) akan dinonaktifkan, yaitu diputus aliran listriknya. Pada saat ini memori komputer (RAM) dikosongkan, sehingga jika hendak menghidupkan komputer kembali, butuh waktu cukup lama untuk me-load sistem operasi (misal Windows) kembali ke RAM. Ini terkait dengan pentingnya memori bagi komputer dan cara kerja sistem operasi.

2. Hibernate
Pada hibernate, komponen komputer juga dimatikan secara keseluruhan, sama seperti shutdown. Bedanya, sebelum dimatikan (sebelum mengosongkan RAM), isi dari memori atau RAM tersebut disalin ke harddisk terlebih dahulu, sehingga saat hendak dihidupkan kembali, tidak membutuhkan waktu terlalu lama karena isi RAM sudah ada di harddisk (tinggal dikembalikan seperti sediakala).

Hibernate dapat menyimpan konfigurasi komputer sebelum dimatikan. Jadi jika misalkan Anda membuka banyak aplikasi kemudian meng-hibernate komputer, saat komputer dihidupkan kembali aplikasi-aplikasi itu masih terbuka seperti kondisi semula (tidak perlu takut kehilangan data). Ini berbeda dengan shutdown yang akan menghapus data Anda jika belum sempat disimpan. Cocok jika Anda hendak meninggalkan komputer dalam waktu yang agak lama.

Namun tidak semua sistem operasi menyediakan fitur hibernate ini. Tidak semua komputer juga dapat di-hibernate oleh sistem operasi.

3. Stand by
Pada kondisi stand by (kalau di Linux disebut suspend), komputer tidak dimatikan secara keseluruhan. Semua komponen komputer mati kecuali memori (RAM). Jadi, semua komponen diputus aliran listriknya kecuali RAM (dan prosesor mungkin). Karena itu, modus stand by masih menggunakan listrik untuk memberi daya pada RAM, berbeda dengan shutdown atau hibernate yang benar-benar mematikan komputer. Untuk menghidupkan komputer kembali dari modus stand by jauh lebih cepat dibandingkan hibernate (bisa dibilang instan), karena isi RAM masih dipertahankan.

Sama seperti hibernate, stand by juga menyimpan konfigurasi komputer sebelum di-stand by. Stand by dapat diibaratkan seperti “pause” saat bermain game. Cocok jika Anda hendak meninggalkan komputer dalam waktu singkat.

Kesimpulan
Apapun pilihan anda untuk menon-aktifkan komputer anda, stand by, hibernate, dan shutdown bisa disesuaikan dengan kebutuhan anda.
Monday, September 20, 2010

Menghilangkan Windows Genuine Advantage (WGA) Notification

menghilangkan windows genuine advantage imageWindows Genuine Advantage(WGA) adalah fitur validasi keaslian windows yang akan memunculkan peringatan jika windows kita tidak asli. Fitur ini akan muncul jika kita rajin online, makanya yang paling sering kena WGA ini adalah laptop yang sering digunakan untuk online. Jika tidak pernah online, maka tentu microsoft tidak akan dapat mengetahui apakah windows anda asli atau tidak.

Windows yang terdeteksi WGA ini dapat menyebabkan antara lain background desktop menjadi hitam, wallpaper tidak muncul dan selalu terdapat peringatan Windows Genuine Advantage. Memang apabila anda menginstall ulang, peringatan WGA bisa saja hilang. Tapi tentu sangat merepotkan karena semua program harus anda install kembali. Namun hanya dengan menginstall ulang windows bukan berarti WGA notification itu tidak muncul lagi.

Ada cara mudah untuk menghilangkan Windows Genuine Advantage, anda cukup me-rename extension dari wgalogon dan wgatray. Selain itu, sebenarnya untuk membuat genuine windows XP sangat mudah, namun berhubung kini XP sudah tidak laku lagi, berikut langkah-langkahnya untuk Windows 7.

- Buka folder system32 yang terdapat di C:\Windows\System32
- Cari file wgalogon.dll & ganti namanya menjadi wgalogon.dll.bak
- Klik kanan pada bagian kosong (folder System32) & pilih New » Text Document dan simpan dengan nama wgalogon.dll
- Cari file wgatray.exe & ganti namanya menjadi wgatray.txt
- Klik kanan pada bagian kosong & pilih New » Text Document dan simpan dengan nama wgatray.exe
- Ganti LegitCheckControl.dll menjadi LegitCheckControl.dll.bak & buat Text Document dengan nama legitcheckcontrol.dll dan simpan di folder System32
- Restart komputer anda!
- Jangan lupa menonaktifkan automatic updatenya dengan klik kanan MyComputer » Klik tab Automatic Update » Pilih Turn Off

1. Manual Method

- Matikan automatic update nya > klik kanan My Computer > properties > klik tab automatic update > klik turn off > OK
- Masuk ke regedit > HKEY_LOCAL_MACHINE\SOFTWARE\Microsoft\Windows NT\CurrentVersion\Winlogon\Notify.
- hapus folder ‘WgaLogon’ dan semua isi nya
- Restart komputer, kemudian masuk pada safe mode dengan menekan tombol F8 saat booting.
- Cari dan hapus file-file dibawah ini

C:\WINDOWS\system32\WgaLogon.dll
C: \WINDOWS\system32\WgaTray.exe
C:\WINDOWS\system32\LegitCheckControl.dll


- selesai. restart windows anda.

2. Cara Otomatis(Menggunakan Software)

Khusus untuk win 7 tidak perlu repot, cukup download software windows 7 loader activator remOVEWAT. Kemudian instal dan jalankan, setelah running dia akan minta restart. jangan lupa non-active kan update windowsnya agar tidak ada lagi Windows Genuine Advantage Notification.
Sunday, May 2, 2010

Trik Mengubah Windows XP menjadi genuine

Dengan munculnya windows 7 bukan berarti itu dapat mengurangi penggunaan windows XP. Masih banyak orang yang percaya dengan windows XP, mungkin karena ada anggapan bahwa windows vista dan windows 7 merupakan produk gagal. Selain karena banyaknya program beta, windows 7 terkesan berat dan tidak jauh beda dengan windows XP.

Bicara tentang windows XP, apakah windows XP anda genuine? atau bajakan? lalu, kalau tidak genuine, gimana cara mengubah windows XP menjadi genuine? Disini akan kartolo jelaskan trik mengubah windows XP kita menjadi windows XP genuine. Karena seperti kita ketahui, dengan mengubah windows XP menjadi genuine akan semakin memudahkan kita dalam update nantinya.

Jika belum berikut Salah Satu Cara Paling Mudah Untuk Validasi Copy Illegal Anda Dari Windows yang saya baca dari sebuah forum luar, dan cara ini sebenarnya juga sudah agak lama sekitar pertengahan tahun 2009, mudah-mudahan berguna untuk anda. Saya sudah mempraktekanya dan bekerja 100%. Sangat mudah dan simpel. Menggunakan metoda hacking.

Langsung saja, langkah pertama cara mengubah XP menjadi genuine:

Buka sebuah notepad kemudian copy dan paste kan code berikut kedalam notepad

Windows Registry Editor Version 5.00

[HKEY_LOCAL_MACHINE\SOFTWARE\Microsoft\Windows NT\CurrentVersion]
"CurrentBuild"="1.511.1 () (Obsolete data - do not use)"
"ProductId"="55274-640-7450093-23464"
"DigitalProductId"=hex:a4,00,00,00,03,00,00,00,35,35,32,37,34,2d,36,34,30,2d,\
37,34,35,30,30,39,33,2d,32,33,34,36,34,00,2e,00,00,00,41,32,32,2d,30,30,30,\
30,31,00,00,00,00,00,00,00,62,fc,61,4c,e0,26,33,16,05,d3,54,e7,a0,de,00,00,\
00,00,00,00,49,36,c2,49,20,47,0c,00,00,00,00,00,00,00,00,00,00,00,00,00,00,\
00,00,00,00,00,00,00,00,00,00,00,33,33,35,30,30,00,00,00,00,00,00,00,65,10,\
00,00,74,99,dd,b0,f7,07,00,00,98,10,00,00,00,00,00,00,00,00,00,00,00,00,00,\
00,00,00,00,00,00,00,00,00,00,00,00,00,00,00,00,00,c4,ae,d6,1c
"LicenseInfo"=hex:e7,77,18,19,f8,08,fc,7d,e8,f0,df,12,6e,46,cb,3f,ad,b2,dd,b9,\
15,18,16,c0,bc,c3,6a,7d,4a,80,8b,31,13,37,5a,78,a2,06,c8,6b,b9,d9,dd,cc,6a,\
9c,c5,9b,77,aa,07,8d,56,6a,7c,e4

[HKEY_LOCAL_MACHINE\SOFTWARE\Microsoft\Windows NT\CurrentVersion\WPAEvents]
"OOBETimer"=hex:ff,d5,71,d6,8b,6a,8d,6f,d5,33,93,fd


Kemudian Save notepad tersebut klik file pilih save pada kotak dialog box pada pilihan Save as type pilih " All files " berikan nama file tersebut terserah anda yang terpenting ekstensi file tersebut .reg lalu klik Save.
mengubah windows XP menjadi genuine image
Setalah file tesebut di save kemudian buka klik dua kali akan ada peringatan Are sure you want to continue? klik Yes.

Kemudian untuk memastikan file .reg tersebut bekerja silahkan cek ke alamat ini untuk validasi:

http://www.microsoft.com/genuine/validate/ValidateNow.aspx?displaylang=en

klik tombol Validasi Windows kemudian klik install ActiveX jika ditanyakan.
Cara ini bekerja untuk windows XP pro, home, SP1, SP2, SP3, hebat kan?

Jika anda ingin menginstall XP coba key windows XP berikut ini :

V2C47-MK7JD-3R89F-D2KXW-VPK3J
Q6TD9-9FMQ3-FRVF4-VPF7Y-38JV3
FPJC9-YTC23-GHKTW-D87K6-WHJPQ
JG28K-H9Q7X-BH6W4-3PDCQ-6XBFJ
CTMDQ-QQVTB-9CMBP-HPJ2T-9D2FG
QYPXW-F9K84-PBW8P-VPWQ9-TRT7M

Jika key Windows XP tadi tidak berhasil anda bisa melakukan reset Activation 30 hari dengan cara jalankan command prompt sebagai admin ketik " slmgr -rearm " tanpa tanda kutip klik enter dan lakukan secara continue selama 30 hari.

Demikian cara mengubah windows XP menjadi genuine, apabila ada pertanyaan langsung komen atau contact kartolo ya. Jika anda bosan dengan windows Xp, silahkan coba Direct Download Windows 7 Free dari kartolo.
Sunday, February 28, 2010

Install SSH Windows | Cygwin SSH


SSH adalah kependekan dari Secure Shell, sebuah protocol network yang memungkinkan data di pertukarkan melalui sebuah kanal yang aman antara dua komputer. Satu unsur di dalam SSH yang memberikan jaminan keamanan dan integritas data adalah enkripsi. SSH menggunakan kunci publik (public-key cryptography) untuk mengautentikasi komputer yang akan melakukan pertukaran data. Pada web hosting, SSH biasanya digunakan untuk masuk ke server hosting dan mengeksekusi perintah - perintah tertentu secara remote (jarak jauh) dari komputer pelanggan sendiri. Dengan SSH pelanggan dapat mengedit file, menghapus, membuat file baru, memindahkan lokasi file dan hal - hal lain. Selain itu SSH memungkinkan transfer data (upload / download) menggunakan protokol SFTP (Secure FTP) dan SCP (Secure Copy).

Client software yang sering digunakan untuk melakukan SSH adalah Putty SSH. Sedangkan untuk melakukan upload dengan SCP, biasanya menggunakan WinSCP. Tentunya Putty SSH adalah hal yang tidak asing lagi bagi kawan - kawan. Kali ini juga saya jelaskan tentang Cygwin SSH sebagai pembantu konfigurasi SSH windows, karena untuk linux sudah sangat umum.

Yang perlu dilakukan konfigurasi SSH windows cukup sederhana, yaitu :

1. Install linux emulator, yaitu cygwin

Download file cygwin


2. Jalankan file setup.exe
  • Saat dipilih install untuk diri sendiri atau semua user, pilih intalasi untuk semua user
  • Pilih Local Package Directory yaitu default di c:\cygwin
  • pilih lokasi download yang terdekat, kita pilih kambing.ui.edu
3. Setelah daftar komponen yang akan diinstall tampil
  • tampilkan detail komponen dengan menekan tombol Full view
  • Pilih komponen berikut yang harus ada dalam instalasi : openssh, tcp_wrappers, difutils, zlip
  • pastikan terinstall dengan cara klik link skip sehingga tombol tampil
4. Tekan tombol Next, dan proses instalasi akan dilakukan
  • Saat selesai install, iconnya yang di desktop dibuat sekalian (biar enakan)
5. Jalankan program Cygwin, pastikan jalan tidak ada error

6. Perbaiki keamanan folder
  • chmod +r /etc/passwd
  • chmod +r /etc/group
  • chmod 777 /var
7. Jalankan konfigurasi SSH server
  • ssh-host-config -y
  • jika ada konfirmasi dialog, jawab saja “yes”
8. Amankan konfigurasi file
  • tty ntsec
9. Jalankan SSH server
  • cygrunsrv -S sshd atau
  • net start sshd
10. Ujicoba dengan ssh 127.0.0.1

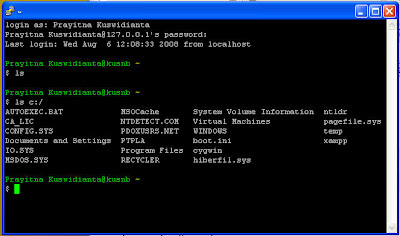
Gampang sekali kan install SSH Windows melalui Cygwin SSH? Hasilnya akan begini:

ssh windows cygwin image

Semoga bermanfaat,


Menambah Kecepatan Internet dengan Windows Proxy Server(SQUID)

windows proxy server imageKecepatan internet memang tidak selalu sesuai dengan apa yng kita inginkan. Kadang cepat, kadang lambat. Saat kecepatan internet lambat, seperti biasa terjadi di warnet atau warung free hotspot misalnya, kita memang akan merasa jenuh dan ingin rasanya bandwidth hanya milik kita sendiri. Apa daya, walaupun kita komplain pada pemilik warung, karena kecepatan intenet lambat mereka akan menjawab dengan jawaban klasik "memang dari sana-nya mas, mungkin ada gangguan, tunggu aja, nanti juga cepat sendiri...", ya, hanya itulah yang bisa mereka katakan. Tetapi bukan berarti kita tidak bisa melakukan apa - apa. Kita bisa mengubah settingan laptop/komputer kita agar lebih friendly dengan bandwidth dalam rangka menambah kecepatan internet kita. Dalam hal ini akan saya bahas mengenai cara menambah kecepatan internet dengan menggunakan SQUID sebagai windows proxy server. Dalam artikel ini, saya dibantu oleh blog guntingbatukertas.

Dengan windows proxy server ini kita akan mendapatkan beberapa keuntungan. Yaitu menghemat bandwidth sekaligus menambah kecepatan internet. Yang mana saat kita menggunakan access mobile broadband yang biasanya tidak mendapat sinyal fullbar, akan dapat meningkatkan kecepatan internetnya sebesar 3x lipat, tentunya dengan bantuan windows proxy server ini. Yaitu SQUID Proxy.

Cara Kerja SQUID Proxy :
Tiap kita mengakses situs sebenarnya yang kita lakukan adalah mendownload semua data berupa tulisan, link, teks, gambar dan file lain dalam halaman tersebut.
Dalam proses standar, semua file ini akan disimpan dalam file temporer browser. Namun pada prakteknya, tiap kita membuka halaman yang sama, kita tetap mendownload file yang sama, berulang kali. Anggap saja suatu halaman web berukuran total 500KB, maka jika kita membuka halaman tersebut sepuluh kali dalam sehari maka kita akan menggunakan bandwith sebesar 500KB x 10 = 5MB!

Proxy atau juga yang disebut Squid sebenarnya adalah program yang dikembangkan dalam dunia Linux yang bekerja efektif mengelola file temporer. Saya menemukan SquidNT yang dikembangkan dari versi linuxnya oleh Guido Serassio. Cara kerjanya sama dengan Squid di Linux, yakni dengan otomatis menyimpan semua file yang kita download saat mengakses situs di dalam satu file temporer yang disebut cache. Di sana semua konten, alamat, teks, gambar dan halaman web disimpan. Pada saat kita mengakses situs untuk pertama kali, squid akan secara otomatis menyimpannya dan membuat link bayangan agar saat halaman yang sama dibuka untuk kedua kali, browser tidak langsung mendownload dari situs aslinya. Melainkan mendownload dari cache squid yang notabene ada di PC/LAN. Sehingga halaman web akan lebih cepat terbuka. Jika kita sering membuka halaman yang sama, prosesnya akan jauh lebih cepat saat kedua kali dan seterusnya.

Sekarang kita lihat, berapa perhitungan bandwithnya. Suatu halaman sebesar 500KB, berisi halaman web sederhana dan berbagai gambar. Squid hanya akan mendownload kode HTML nya saja dan menyaring semua informasi yang ada di dalamnya. Jika dalam screening ini semua data pendukung (gambar, skrip, file) sudah ada di cache, bandwith Anda tidak akan lebih besar dari 100Kb bahkan lebih kecil lagi. Anggap saja kita lakukan refresh selama 10 kali maka hasil yang didapat adalah: 100KB x 10 = 2MB saja. Anda bisa menghemat bandwith menjadi 1/5 bahkan lebih kecil lagi. Apalagi buat yang pakai internet dari smart yang gak dapet banyak sinyal. Baca juga artikel Cara Efektif untuk Meningkatkan Koneksi Internet Smart.


INSTALASI DAN SETTING SQUID
Pertama, anda download dulu SQUID-nya.

Download Squid 2.7 Stable7 untuk Windows
Download Alternatif Mirror Squid 2.7 Stable7 untuk Windows

Selanjutnya langkah instalasi:

1. Ekstrak file Squid-2.7STABLE7.bin yang telah Anda download. Saya sarankan Anda ekstrak ke c:\squid\ untuk lebih mempermudah Anda mengikuti tutorial ini.
2. Lihat dan perhatikan isi folder c:\squid\etc\. Disana ada beberapa file konfigurasi default squid sebagai berikut:
  • cachemgr.conf.default
  • mime.conf.default
  • squid.conf.default
  • squid_radius_auth.conf.default
Yang perlu Anda lakukan adalah, me-rename keempat tersebut menjadi:
  • cachemgr.conf
  • mime.conf
  • squid.conf
  • squid_radius_auth.conf
3. Buka file squid.conf dengan editor teks. Anda bisa gunakan Notepad, Wordpad atau program pihak ketiga seperti Notepad++. Temukan tulisan TAG: http_port. Pastikan di bagian bawah TAG ini sudah ada tulisan http_port 3128 sehingga tampak seperti berikut:

# TAG: http_port
# Usage: port [options]
# hostname:port [options]


# If you run Squid on a dual-homed machine with an internal
# and an external interface we recommend you to specify the
# internal address:port in http_port. This way Squid will only be
# visible on the internal address.
#
# Squid normally listens to port 3128
http_port 3128


4. Temukan TAG: visible_hostname, tambahkan tulisan visible_hostname localhost di bagian bawah tag ini. Anda boleh menghapus tulisan # none. sehingga tampak seperti berikut:

# TAG: visible_hostname
# If you want to present a special hostname in error messages, etc,
# define this. Otherwise, the return value of gethostname()
# will be used. If you have multiple caches in a cluster and
# get errors about IP-forwarding you must set them to have individual
# names with this setting.
#
#Default:
visible_hostname localhost


5. Temukan http_access allow localnet. Tambahkan http_access allow localhost di bawahnya menjadi:

# Example rule allowing access from your local networks.
# Adapt localnet in the ACL section to list your (internal) IP networks
# from where browsing should be allowed
http_access allow localnet
http_access allow localhost


6. Temukan TAG: dns_nameservers, pada tulisan dns_nameservers. Pada bagian bawah tag ini, isi dengan alamat DNS dari ISP yang Anda gunakan dengan format dns_nameservers [primary DNS] [secondary DNS]. Dalam hal ini saya menggunakan ISP speedy Wilayah Jatim maka akan tampak sebagai berikut:

# TAG: dns_nameservers
# Use this if you want to specify a list of DNS name servers
# (IP addresses) to use instead of those given in your
# /etc/resolv.conf file.
# On Windows platforms, if no value is specified here or in
# the /etc/resolv.conf file, the list of DNS name servers are
# taken from the Windows registry, both static and dynamic DHCP
# configurations are supported.
#
# Example: dns_nameservers 10.0.0.1 192.172.0.4
#
#Default:
dns_nameservers 202.134.1.10 203.130.208.18

Akhiri dengan menyimpan file squid.conf tersebut.

7. Buka Start > Run > Ketik CMD [Enter]. Dalam Command Prompt, ketik baris perintah berikut:

c:\squid\sbin\squid.exe -z [Enter]

Jika muncul pesan popup Windows Security Alert, pilih Unblock untuk memberi akses kepada instalasi Squid Proxy.

8. Selanjutnya, ketik perintah berikut:

c:\squid\sbin>squid.exe -d l -D [Enter]

Tunggu beberapa saat kemudian tekan CTRL + C.

9. Ketik perintah berikut:

c:\squid\sbin>squid.exe -i [Enter]
c:\squid\sbin\squid.exe -O -D [Enter]

Setelah mengetik keempat baris perintah di atas, layar Command Prompt Anda seharusnya akan tampak seperti berikut ini:
windows proxy server graphic
10. Jalankan Service Panel melalui Control Panel > Administrative Tools > Services. atau
Start > Run > ketik Services.msc [Enter]

Temukan service bernama Squid > Klik link Start di panel sebelah kiri untuk menjalankan Squid.
menambah kecepatan internet graphic
11. Selanjutnya, Ubah setting Browser Anda. Arahkan proxy pada browser anda ke alamat localhost dengan port 3128. Untuk Firefox, langkah setting nya tampak seperti berikut:
menambah kecepatan internet graphic
Secara default Squid akan menjalankan proses sendiri tiap kali PC melakukan restart. Cache squid ini disimpan dalam folder c:\squid\var\cache. Untuk melihat log file squid proxy, Anda bisa mengetikkan:

more c:\squid\var\logs\access.log [Enter]


UNINSTALL
Jika Anda ingin menghapus squid, ketikkan perintah berikut di Command Prompt.

c:\squid\sbin>squid -r -n squid [Enter]

Selesai.

INSTALASI CARA CEPAT
Bagi Anda yang nggak mau pusing-pusing dengan setting di atas, sudah sediakan Squid Proxy di atas yang sudah dikonfigurasi lengkap. Anda tinggal meng-ekstrak, dobel klik file konfigurasi, setting browser dan Kecepatan akses Anda sekarang jadi beberapa kali lebih cepat.

Download SquidProxy-2.7STABLE7 Siap Pakai
Password: guntingbatukertas.com

Keterangan:
Dalam file konfigurasi default (squid.conf) Squid siap pakai di atas saya menggunakan dns dari Google. Dengan setting tersebut seharusnya Anda sudah bisa langsung online tanpa melakukan perubahan apapun.
Tapi sekedar untuk backup, saya sudah menyertakan beberapa DNS lain seperti DNS Speedy dan OpenDNS. Jika perlu, silakan pilih sesuai keinginan. Dalam hal ini yang perlu Anda lakukan adalah membuka file squid.conf di \squid\etc\ dan temukan bagian berikut:

.....
# Hapus tanda (#) di depan baris berikut jika Anda ingin menggunakan DNS Speedy Jatim dan Jateng
#dns_nameservers 202.134.1.10 203.130.208.18
# Hapus tanda (#) di depan baris berikut jika Anda ingin menggunakan DNS Speedy Jakarta – Jateng
#dns_nameservers 202.134.0.155 203.130.208.18
# Hapus tanda (#) di depan baris berikut jika Anda ingin menggunakan DNS OpenDNS
#dns_nameservers 208.67.222.222 208.67.220.220
# Tambah tanda (#) di depan baris berikut jika Anda TIDAK ingin menggunakan DNS Google
dns_nameservers 8.8.8.8 8.8.4.4
....


Perhatikan, dari baris di atas, hanya satu baris dns_nameservers yang tidak didahului tanda comment (tanda #). Yakni di depan dns_nameservers punya Google. Itulah setting yang sedang aktif/digunakan. Untuk memilih setting dns yang lain Anda tinggal memberi comment (tanda #) di depan dns_nameservers yang sedang aktif dan menghapus dns_nameservers lain yang Anda inginkan. Ingat, Anda hanya diperbolehkan memlih dns_nameservers yang aktif.

Misalnya saya memakai OpenDNS, maka setting diatas perlu diubah ubah menjadi:

....
# Hapus tanda (#) di depan baris berikut jika Anda ingin menggunakan DNS Speedy Jatim dan Jateng
#dns_nameservers 202.134.1.10 203.130.208.18
# Hapus tanda (#) di depan baris berikut jika Anda ingin menggunakan DNS Speedy Jakarta – Jateng
#dns_nameservers 202.134.0.155 203.130.208.18
# Hapus tanda (#) di depan baris berikut jika Anda ingin menggunakan DNS OpenDNS
dns_nameservers 208.67.222.222 208.67.220.220
# Tambah tanda (#) di depan baris berikut jika Anda TIDAK ingin menggunakan DNS Google
#dns_nameservers 8.8.8.8 8.8.4.4
.....


Simpan, dan setting Anda yang baru siap dicoba. Sekian artikel kartolo mengenai Menambah Kecepatan Internet dengan Windows Proxy Server(SQUID). insya Allah bisa menambah kecepatan internet anda.

Semoga bermanfaat,


Source: http://guntingbatukertas.com/sistem-operasi/windows/hemat-bandwith-dan-dongkrak-kecepatan-akses-internet-dengan-squid-proxy/


About Me